Searching Album of The Year using Flask, Selenium, Docker, and React
Click here for post's source code
Click here for part 1 of this series.
In this tutorial we'll design an app to find out which albums were released on a specific day. But you'll learn so much more along the way...
In part 1 we answered the question
"Can I find out which albums were released on my birthday?"
You sure can, just read on to find out how.
In part 1 of this guide we brought up that if you can relate to any of these then you're definitely in the right place.
- If you want to learn some Docker and Selenium basics in a fun project before moving on to more complex Docker Compose and automated testing applications.
- If you're a new developer stuck in tutorial purgatory who wants to wrap their head around more challenging concepts, then you can go deeper down the rabbit hole by following the links throughout the guide.
- If you're a student or are learning to code and searching for a project to talk about in interviews to help get your foot through the door.
In this guide, the same applies, and in addition, this guide is absolutely for you if you're interested in any of these.
- Creating a custom frontend with the JavaScript framework React.
- Adapting a Python console app into a Flask webserver.
From ReactJS:
A JavaScript library for building user interfaces
From Python Basic - What is Flask Python?:
"Flask is a web application framework written in Python. A Web Application Framework or simply a Web Framework represents a collection of libraries and modules that enable web application developers to write applications without worrying about low-level details"
Looking for source code?
Jump to the Github Repo
**
Searching Album of The Year using Flask, Selenium, Docker, and React
Firstly, we'll use create-react-app to generate the template for our frontend.
Next, we'll customize our frontend interface and set up the functions that send requests to our Flask webserver.
Then, we'll adapt our Python console app into a Flask webserver.
We'll wrap up with a discussion of our results and how we could take this further.
- Configuring your development environment
- React Frontend
- Flask Webserver Backend
- Results
- What's Next?
- Troubleshooting
Configuring your development environment
If you want to follow along with the tutorial you can take some time to set up your environment by installing Docker using either of these guides
Either will help you set up the required software for this tutorial.
In addition to Docker, you'll also need NodeJs which you can install with either of these guides
You can now move on to creating our React app.
React Frontend
First we can start with a
generated single-page application
with the help of create-react-app
npx create-react-app aoty-frontend
cd aoty-frontend
npm start
npx is the package runner tool that comes with npm which is the node package manager installed along with NodeJS.
The generated app will now be in the folder aoty-frontend which I would now recommend opening with your IDE/text
editor of choice.
We'll start be rewriting src/App.js. We can change the App()
function to
function App() {
  return (
    <div></div>
  );
}
Now we can add a heading, and the basic html for the form
<div>
  <h1>Album of the Year Searcher</h1>
  <form action="#">
    <label>
      Date
      <input type="date" name="date" id="date" />
    </label>
    <button type="submit" id="submit-date">Search</button>
  </form>
</div>
Now, under the form we want to add a loading spinner if the app is in the state of searching for albums.
{
  this.state.searching ?
    <div className="text-center">
      <div className="spinner-border" role="status">
        <span className="sr-only">Loading...</span>
      </div>
    </div>
    : null
}
The class names are actually Bootstrap specific - which is a CSS framework for developing responsive sites.
We'll return to Bootstrap later, but for now, we'll want a way to display the albums our search found. Just under the previous code we can map the results returned from our search to list item elements.
{
  this.state.results.length !== 0 ? (
    <ul>{
      this.state.results.map((result, i) =>
        <li key={i}>{result}</li>
      )
    }</ul>
  ) : null
}
We'll want to take the form submission into our own hands next and add a little styling
<form onSubmit={this.submitHandler.bind(this)} action="#" style={{ display: `grid`, gap: `10px` }}>We'll change the App function to a class now, here's where we're at now, also note the new import
import React, { Component } from "react"

class App extends Component {
  constructor(props) {
    super(props);
    this.state = {
      results: [],
      searching: false,
    };
  }

  render() {
    return (
      <div>
        ...
      </div>
    )
  }
}
Now we can add the submitHandler function that is called on form submission
async
submitHandler(e)
{
  // Prevent browser's default form submission behaviour
  e.preventDefault()
  // Extract date from form and split into array
  const date = e.target.date.value.split("-")
  // Store year, month code, and formatted day from date array
  const year = date[0]
  const monthCode = date[1]
  const day = parseInt(date[2], 10) // 01 becomes 1, etc.

  // Create request body
  const body = {}
  body.day = day
  body.month_code = monthCode
  body.year = year

  // Set searching to true to display loading spinner
  this.setState({
    searching: true,
  })

  // Send POST request to backend and await a response
  const response = await fetch(`http://localhost:5000/`, {
    method: "POST",
    headers: {
      "Content-Type": "application/json"
    },
    body: JSON.stringify(body)
  })
  // If the response is OK then set state to display albums
  if (response.status === 200) {
    const data = await response.json();
    this.setState({
      results: data.results,
      searching: false,
    })
  }
}
That's essentially all the work done on the frontend, we can just add some styling now with Bootstrap
As we mentioned earlier... From w3schools - What is Bootstrap?:
"Bootstrap is the most popular CSS Framework for developing responsive and mobile-first websites."
We can open the aoty-frontend folder in the terminal and run
npm install react-bootstrap bootstrapInside the <head> tag of public/index.html we can include the Bootstrap CDN link
<head>
  ...
  <link
    rel="stylesheet"
    href="https://cdn.jsdelivr.net/npm/bootstrap@4.6.0/dist/css/bootstrap.min.css"
    integrity="sha384-B0vP5xmATw1+K9KRQjQERJvTumQW0nPEzvF6L/Z6nronJ3oUOFUFpCjEUQouq2+l"
    crossorigin="anonymous"
  />
  ...
</head>
And in either src/index,js or src/App.js we can include the following line
import 'bootstrap/dist/css/bootstrap.min.css';Now we can head back to src/App.js and at the top of the file add
import Container from 'react-bootstrap/Container'We'll use Bootstrap and CSS Grid to customise what our App renders now
render()
{
  return (
    <Container>
      <div style={{ display: `grid`, gap: `20px` }}>
        <h1>Album of the Year Searcher</h1>
        <form onSubmit={this.submitHandler.bind(this)} action="#" style={{ display: `grid`, gap: `10px` }}>
          ...
        </form>
        ...
      </div>
    </Container>
  )
}
We can now move on to programming our Flask backend.
Flask webserver backend
We're essentially rewriting the code from part 1 of the guide, but I'll go over the code here too, so it isn't required you've read the first installment.
A quick way to get up and running is to create a new directory on the terminal with mkdir and open it with VS Code
sudo mkdir aoty-flask-backend
code aoty-flask-backend
We can create a virtual environment within the aoty-flask-backend
folder then (I like to open the VS Code terminal with ctrl+alt+`)
python3 -m venv .venvAnd we can activate the environment with
source .venv/bin/activateFor more info you can check out the official Python documentation on venv
Note that you may need to change python3 to python depending on which version you have installed.
Next we'll install the necessary packages to get up and running
pip3 install requests flask selenium flask_corsNow we can import the packages
# For handling requests and responses
import requests
import json
from flask import Flask, request
# Selenium imports
from selenium import webdriver
from selenium.common.exceptions import NoSuchElementException, \
    StaleElementReferenceException
import time
# To run Docker commands
import os
# To enable requests from the frontend user interface
from flask_cors import CORS, cross_origin
We then create and configure the app
# Create Flask instance
app = Flask(__name__)
From Flask - Application Setup:
__name__is the name of the current Python module. The app needs to know where it’s located to set up some paths, and__name__is a convenient way to tell it that.
Next, we use the flask_cors module to allow communication between our frontend interface and backend webserver.
# Enable CORS to permit requests from the frontend to the backend (a different origin)
CORS(app) # Enables CORS for all routes
# Allow Content-Type header
app.config['CORS_HEADERS'] = 'Content-Type'
From MDN Web Docs - CORS:
Cross-Origin Resource Sharing (CORS) is an HTTP-header based mechanism that allows a server to indicate any other origins (domain, scheme, or port) than its own from which a browser should permit loading of resources
Next, we'll start the Selenium Docker container
# Start Selenium webdriver container
os.system(
    'sudo docker run --name my-selenium-container -d -p 4444:4444  -v /dev/shm:/dev/shm selenium/standalone-firefox:4.0.0-beta-1-prerelease-20210210')
This command starts a standalone Firefox container. For other browsers and a description of why -v /dev/shm:/dev/shm
is necessary you can visit the Docker Selenium Page.
Now we'll work on our one and only route. First we'll just get data from the form and format it
@app.route('/', methods=['POST'])
@cross_origin()
def search_albums():
    # Get data from form
    data = request.json
    day = data['day']
    month_code = data['month_code']
    year = data['year']
    month = ''
    month_name_short = ''

    # Set month and month_name_short based on month_code
    if month_code == '01':
        month = 'january'
        month_name_short = 'Jan'
    elif month_code == '02':
        month = 'february'
        month_name_short = 'Feb'
    elif month_code == '03':
        month = 'march'
        month_name_short = 'Mar'
    elif month_code == '04':
        month = 'april'
        month_name_short = 'Apr'
    elif month_code == '05':
        month = 'may'
        month_name_short = 'May'
    elif month_code == '06':
        month = 'june'
        month_name_short = 'Jun'
    elif month_code == '07':
        month = 'july'
        month_name_short = 'Jul'
    elif month_code == '08':
        month = 'october'
        month_name_short = 'Aug'
    elif month_code == '09':
        month = 'september'
        month_name_short = 'Sep'
    elif month_code == '10':
        month = 'october'
        month_name_short = 'Oct'
    elif month_code == '11':
        month = 'november'
        month_name_short = 'Nov'
    elif month_code == '12':
        month = 'december'
        month_name_short = 'Dec'

    # Format release date to search for like "Sep 20"
    release_date_to_search = '%s %s' % (month_name_short, day)
This command starts a standalone Firefox container. For other browsers and a description of why -v /dev/shm:/dev/shm
is necessary you can visit the Docker Selenium Page.
The next piece of code is actually very important. When we start our container we need to wait for it to be in a state where it's ready to provide the services we need to use it as our remote webdriver.
ready = False
time.sleep(5)
while not ready:
    try:
        r = requests.get('http://localhost:4444/wd/hub/status', timeout=1)
        status = r.status_code
        if status == 200:
            ready = True
    except ConnectionResetError or ConnectionError:
        continue
Essentially, we keep hitting the status endpoint until it says it's ready, and then we can move on with the rest of our Python script. Now we can connect to the remote Firefox webdriver
# Connect to remote Firefox webdriver
driver = webdriver.Remote(desired_capabilities=webdriver.DesiredCapabilities.FIREFOX,
                          command_executor="http://localhost:4444/wd/hub")
We can connect to our remote webdriver on localhost since due to the docker run command -p 4444:4444 which maps port
4444 of the container to port 4444 of our local machine.
And go to the AOTY page for the specified month
# Go to Album of the Year page for specific month
driver.get(
        "https://www.albumoftheyear.org/%s/releases/%s-%s.php?s=release&genre=all" % (year, month, month_code))
Next, we'll code our PySelenium bot to keep clicking the button to load more albums.
all_albums_loaded = False

while not all_albums_loaded:
    try:
        show_more_button_container = driver.find_element_by_class_name('showMore')
        time.sleep(3)
        driver.execute_script("arguments[0].click();",
                              show_more_button_container.find_element_by_class_name('largeButton'))
        time.sleep(1)
Note we're using the execute_script method as opposed to the click() method of the WebElement
object returned by find_element_by_id
We do this because another element is covering the show more button. You can
see this StackOverflow answer by user RemcoW for more details and an
explanation of arguments[0]
We're not quite finished with this while loop just yet, we need to do two things:
- except StaleElementReferenceException - our WebElement can be destroyed and re-rendered in the DOM, so we'll need
to retry by using
continueif our reference becomes stale. This StackOverflow answer by user Ardesco describes the situation more clearly. - except NoSuchElementException - tell our bot they can stop trying to click the button now, it isn't being rendered to the UI so all albums are on the page.
For completeness, this is our complete while loop
while not all_albums_loaded:
    try:
        show_more_button_container = driver.find_element_by_class_name('showMore')
        time.sleep(3)
        driver.execute_script("arguments[0].click();",
                              show_more_button_container.find_element_by_class_name('largeButton'))
        time.sleep(1)
    except StaleElementReferenceException:
        continue
    except NoSuchElementException:
        all_albums_loaded = True
We can store all albums being displayed in a variable now, so we can easily iterate through them.
albums = driver.find_elements_by_class_name('albumBlock')Let's do just that
response = []
# For each album, if the release date matches the date to search for then append it to the response array
for album in albums:
    album_release_date = album.find_element_by_class_name('date').text
    if album_release_date == release_date_to_search:
        album_title = album.find_element_by_class_name('albumTitle').text
        artist_title = album.find_element_by_class_name(
            'artistTitle').text
        response.append('%s - %s' % (album_title, artist_title))
This is really our main block of code. We iterate through each album and append to our response array it's title and
artist if it was released on the day we have specified to search for.
We can do a little housekeeping by returning a message if no albums match the release date and closing our driver connection
# If no albums are found return a message informing the user
if len(response) == 0:
    response.append('No albums found')

# Close connection to Firefox webdriver
driver.close()
Finally, we'll return our response to the user
# Return response to user
return json.dumps({'results': response}), 200, {'ContentType': 'application/json'}
And we'll provide the command to run our Flask app outside the function
if __name__ == '__main__':
    app.run()
Congrats! Now let's see the results of our hard work in the next section.
You can find all the source code for this guide here.
Results
Let's try searching for the albums released on a certain date to see our results.
Inside the virtual environment, we can run
python3 app.pyto start our webserver
If you've followed along and used sudo in the docker run command you'll be prompted for your password, and then we can
move to our frontend application and restart the server (hint: ctrl+c and npm start) which can be accessed
at http://localhost:3000
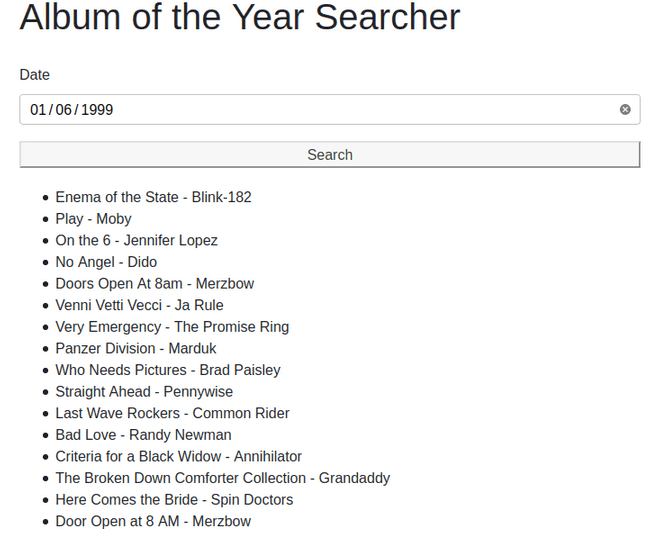
Now we can enter a date and search
We can see the request has been successful on the backend
And the results come back to the user on the frontend
What's Next?
Remember you can grab the source code so you can take this and run with it adapting it however you like, read on to find out what my plans are for this project and ideas about where this could go next.
We can improve our frontend by designing with our users in mind with an interface integrating the album covers, and we could even add filtering by genre.
Another possible challenge to take on would be deployment using services such as Heroku and Netlify.
Stay tuned to my blog, you don't want to miss out!
Bonus: Troubleshooting
Here are some resources for resolving common errors you might run into along the way in this guide or in your own explorations.
-
requests.exceptions.ConnectionError: ('Connection aborted.', ConnectionResetError(104, 'Connection reset by peer'))- this is a common error coined The Python "Connection Rest By Peer"
Problem. You can
read more about it in this StackOverflow post by user S.Lott. In our
case it will likely arise from trying to access the status endpoint of the Selenium container before the container
is ready. You can use
time.sleep(1)before making a request tohttp://localhost:4444/wd/hub/statusand adjusting the time to fit your needs.
- this is a common error coined The Python "Connection Rest By Peer"
Problem. You can
read more about it in this StackOverflow post by user S.Lott. In our
case it will likely arise from trying to access the status endpoint of the Selenium container before the container
is ready. You can use
pip: command not found- this is likely a problem relating to your environment as described (along with solutions) in this post by James Gallagher on Career Karma. It may be as simple as changingpiptopip3or you may need to actually install pip3, for example with apt-getsudo apt-get -y install python3-pipStaleElementReferenceException- our WebElement can be destroyed and re-rendered in the DOM, so we'll need to retry by usingcontinueif our reference becomes stale. This StackOverflow answer by user Ardesco describes the situation more clearly. We can catch this exception in anexceptblock and tell our code to retry a certain operation until the exception doesn't occur. You can see the example we've used in this guide where our solution was to use thecontinuekeyword inside awhileloop.-
Element is not clickable at point (x,y) because another element obscures it- You can see this StackOverflow answer by user RemcoW for more
details, and an explanation of our solution in this guide which was to use
driver.execute_script("arguments[0].click();", element)as opposed to theclick()method of theWebElementobject returned byfind_element_by_id
- You can see this StackOverflow answer by user RemcoW for more
details, and an explanation of our solution in this guide which was to use
-
Failed to connect to localhost port 4444: Connection refused- If you're planning to access the Selenium webdriver endpoint from within a different Docker container you can
change
http://localhost:4444/wd/hubtohttp://172.17.0.1:4444/wd/huborhttp://host.docker.internal:4444/wd/hub. The rationale behind this is provided in this StackOverflow answer by user devnev.
- If you're planning to access the Selenium webdriver endpoint from within a different Docker container you can
change
-
requests.exceptions.ConnectionError: HTTPConnectionPool(host='localhost', port=4444): Max retries exceeded with url: /wd/hub/status- to solve this error you should run
sudo docker rm -f my-selenium-container
- to solve this error you should run


